Working With Mind-Body Training Tools Apps - A General Overview
Contents
- Introduction & Software Architecture
- Working with Devices
- User and Data Management
- Overview of Feedback and Thresholding
- Biofeedback App UI: Common Features & Concepts
- Working with Breathing
- External Feedback Utilities
- Report Functionality
- Managing Session Data
1. Introduction
This guide is a general introduction to working with Mind-Body Training Tools biofeedback and neurofeedback software. The aim is to build an understanding of concepts and ideas that underlie all the different apps in the suite, and should be read or perused before you start working with any individual application.
MBTT Software Architecture
Mind-Body Training Tools consists of two distinct software programs:
- BioEra, best understood as a software toolkit for developing biofeedback and neurofeedback applications
- The Platform program, which is a “front-end” for the apps, and manages and organises session data.
In MBTT each individual app, such as the Heart Coherence app, was built using BioEra - technically speaking each app is a “BioEra design”.
The Platform is a sort of “user interface layer”. Summarising, it's functions are:
- Launch point for individual apps (the user doesn't need to start BioEra independently of the platform).
- Configures the apps based on your choices, for example your selection of device, and in the case of EEG neurofeedback, your selection of protocol and feedback modality.
- Manages and organises session data generated by the apps.
- Generates reports that present and summarise this session data.
- Offers additional feedback modalities besides those available within the apps, for example “shadow” feedback (a window of variable opacity designed to be used with videos or games being played independently of MBTT).
Platform Program User Interface
The platform program, when first launched, looks like this:
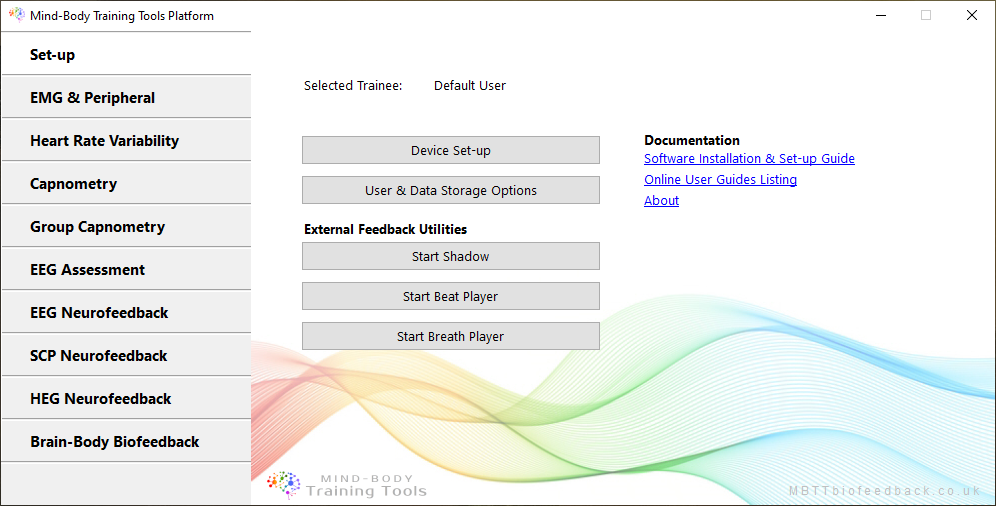
The user interface (UI) consists of a series of tab-buttons running down the left side. Clicking these moves between tabbed sub-interfaces. There is one for each module, or biofeedback modality, plus a set-up tab. Henceforth I will refer to each tabbed area as a module interface.
When you click on the 'HRV Biofeedback' tab-button, you see this screen:
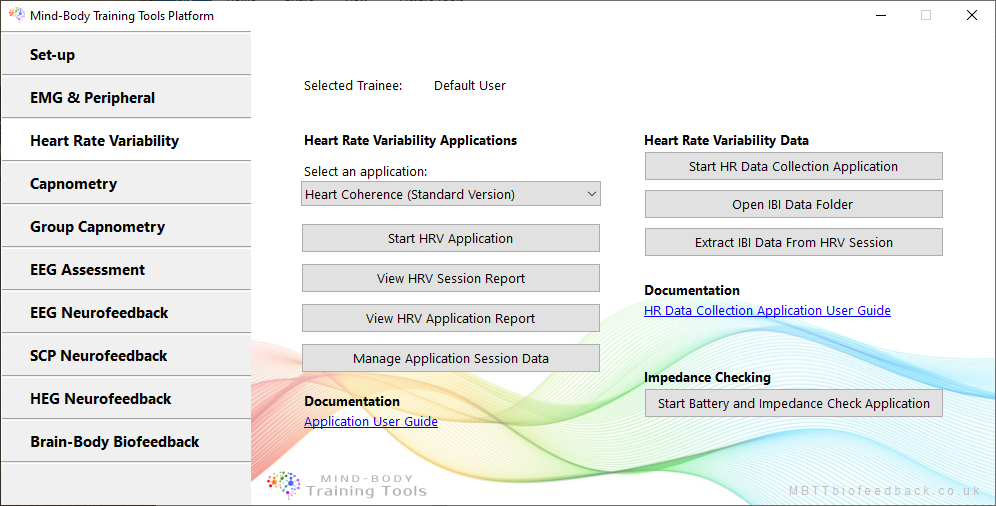
Here you can see there are buttons to:
- select a specific biofeedback app
- launch the selected app
- generate reports for the selected app
2. Working with Devices
BioEra is able to read physiological data from a range of devices. You as the user must select which device you actually have. This is done before you launch any individual app.
The Set-up tab of the Platform program is the place to do this. Click the ‘Device Set-up’ button - this opens a dialog, shown in the figure below.
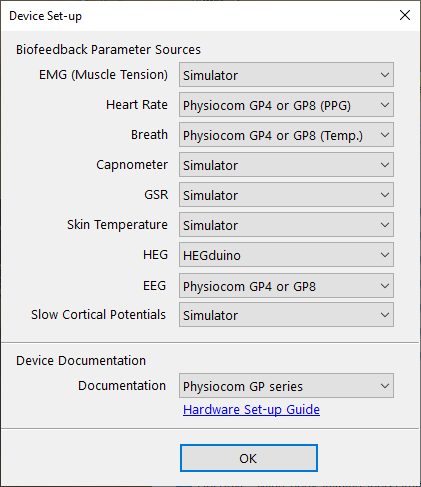
You see that there is a device selection option for each different physiological parameter - for example EMG for muscle tension.
Many of the apps work with more than one parameter - for example the Heart Coherence app measures both heart rate and breath. You must select the device for each parameter your app uses. Often this will be one and the same device type, but some of the apps work with two different devices - for example the Capnometry and EMG app always works with two different devices.
Simulator Mode
An option for each of the device or source settings is “Simulator”. Selecting this option means that the software doesn't read live data from a device but instead plays back a recording. The purpose is to make it easy for new users to learn to operate the software - without the encumbrance of sensors etc.
I recommend all users take advantage of this option.
Again you must select Simulator for each parameter that your app uses.
Session Replay
Another of the options for each parameter source is “Session replay”. When selected, it allows you to replay recordings from earlier sessions. The same app is used, and sessions are replayed at the original rate, however there are buttons to make jumps in the recording so that you can quickly get to a point of interest.
Again you must select replay for each parameter used by the app.
After making the replay selection in device settings, click to launch your app in the usual way - at this point you will be offered a dialog to select the session to replay. (When sessions are recorded, they are given a default name which incorporates their date.)
Session recordings are only available for replay if you have set an option to record “.edf” files - see the following section on user and data management.
3. User & Data Management
When you run a biofeedback session, the software writes data which can later be used to generate summary reports. Another option is that sessions can be replayed using the same app that they were recorded from.
You need to first configure one or two options - click the ‘User & Data Storage Options’ button to open a dialog for these options (see the figure below).
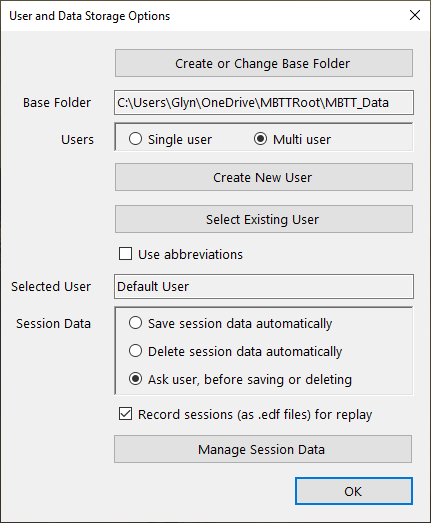
The first thing you need to do is nominate a folder on your computer in which to store all session data. If you don't do this, you can still run biofeedback sessions but no data will be recorded, and no reports will be available.
If you're a professional practitioner working with clients, you'll want to keep data pertaining to individual clients separate and distinct. If you're a home user sharing a device with family and / or friends, you'll probably want to do the same.
MBTT allows you to create and select named users to this end.
Alternatively, if you're the only person using the software, or the particular computer you've installed it on, then you can opt for simply a “default user”.
Session Data Files in Detail
When you run a biofeedback session, BioEra creates two session files:
- The first is a simple text file containing summary data. Lines of data are written at intervals, e.g. once per second or once per heart beat or once per breath.
- The second is a .edf file, which contains all the data that the device reads. It is written continuously, or at the device sample rate. The file will be much larger than the text summary file. Edf files are used for session replay, mentioned above.
Note, the figure above shows a check-box option to record .edf files. If not checked, session edf files are not written and thus session replay will not be available.
4. Overview of Feedback & Thresholding
Biofeedback is a method that measures physiological data and feeds it back in real time, as a basis for learning self-regulation skills. “Feeding back” means presenting the measurements to the user's senses, with changes happening in real time.
Perhaps the simplest example would be to show a bar graph on the computer screen, that goes up and down with the measured parameter. For example, if the measured parameter is EMG for muscle tension, the bar graph would go up as and when the muscle in question tightened up, and down when it relaxed.
This is an example of simple visual feedback, but feedback can also be presented to other senses, for example as a sound. Changes in the feedback sound would likewise reflect real-time changes in the measured parameter.
There are many different ways to present feedback, and besides visual vs auditory there are important conceptual classifications of feedback we need to review. Here we discuss:
- Contingent & discrete feedback (points based)
- Proportional & continuous feedback
- Stop-go or dichotomous feedback
These are best explained with examples
Contingent & Discrete Feedback
Suppose you're doing muscle tension training (EMG biofeedback). The EMG signal varies continuously. You can configure the software so that a bell rings whenever the muscle tension signal goes above a certain limit.
The feedback is a discrete event that is contingent upon a particular psychophysiological state arising (namely, tightness above a certain limit).
Another example of a discrete, contingent feedback event would be a point being scored, in a game. Points-based feedback is also in this category.
Proportional & Continuous Feedback
Suppose you're training to raise EEG alpha amplitude. Again, the feedback parameter (alpha amplitude in this case) varies continuously over a range. You can use video feedback, where a video (e.g. on YouTube) plays continuously but whose brightness varies from dark to bright (in this case ‘bright’ simply means the video looks normal, while ‘dark’ means it opaque or obscured). The brightness varies smoothly and proportionally with the feedback parameter: when alpha amplitude is relatively high the picture is bright, but darkens when alpha amplitude drops.
Stop-go or Dichotomous Feedback
Another way to use video feedback is to pause and play the video depending on the training parameter e.g. alpha amplitude being above or below a certain limit. Rather than varying proportionally, the video state is dichotomous - either playing or paused.
Mind-Body Training Tools employs all three types of feedback.
Thresholds
Thresholds are tools to configure the relationship between the measured feedback parameter and the actual feedback. They control how much of the parameter gives how much feedback.
The concept of thresholding is implicit in all three examples I've given: the thresholds are the ‘limits’ I referred to.
- In contingent, discrete feedback, how much muscle tension is enough to trigger the bell? The threshold is the limit that when crossed, triggers the feedback event.
- In proportional continuous feedback, the thresholds are perhaps less obvious, but they represent how much of the feedback parameter is needed to gain maximal brightness, and also how much to give maximal darkness (minimal brightness).
- In stop-go feedback, again the threshold is clear: it's the limit which, when crossed, switches the feedback state between stop and go.
Setting thresholds (i.e. threshold levels) is key to success in pretty much any form of biofeedback and neurofeedback training.
By this I mean setting the levels in the right place, so that training is engaging - neither too hard nor too easy. For example, in points-based feedback, points can be gained at the right frequency to maintain the trainee's interest - it's neither too hard nor too easy to get a point.
Notice that in proportional feedback two thresholds or limits are necessary, while only one is needed for the other two classes.
Thresholds in Mind-Body Training Tools Software
In MBTT, a threshold refers to a set of controls consisting of a bar chart, usually having two levels, plus other controls that help with setting threshold levels appropriately. The figure below shows a simple threshold - taken from the Heart Coherence app, it's the threshold for Breathing Rate.
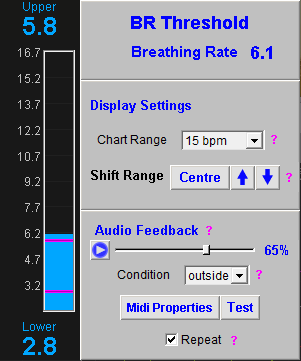
In a simple case like this, the levels are adjusted by dragging them with a mouse. With a Breathing Rate threshold, you could ring a bell whenever the breathing gets too fast. (Of course what constitutes “too fast” is a judgement call.)
Most of the thresholds in the apps are more complex than this. They include methods for setting or updating the threshold levels automatically based on certain criteria. The core principle is the same: the thresholds define how much of the parameter maps to how much feedback.
The operation of thresholds in practice is discussed in the following section.
5. Biofeedback App UI: Common Features & Concepts
The MBTT apps have a common design scheme. The intent is that learning to use one app, can be generalised so that other apps in the suite are easy to learn.
The apps generally have three windows:
- Main window, or trainer's window, containing parameter charts
- Threshold window - each app has at least one threshold, but there are usually more.
- Feedback window - in a sense, all charts and thresholds are giving feedback, but the feedback window contains controls for audio feedback plus more specialised feedback forms.
Here we'll use the Heart Coherence app as an illustrative example.
The main screen looks like this:
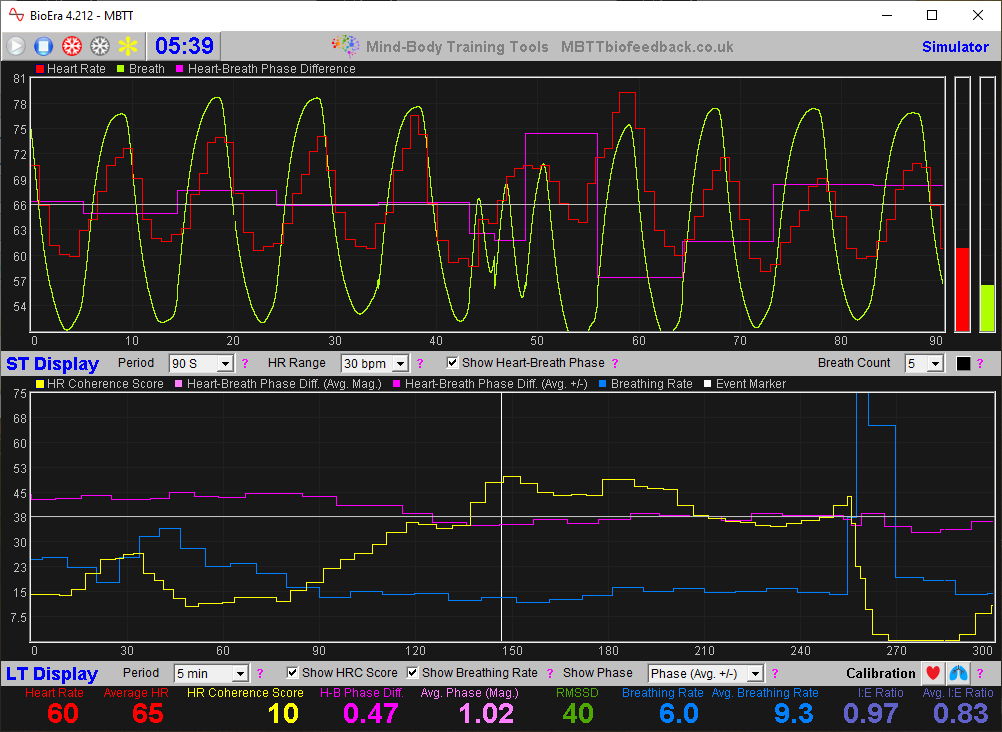
The upper half has a parameter chart for the short-term (short time scales) and the lower half has a longer-term parameter chart. Each chart has controls below it for adjusting e.g. the scales.
In the top-left of the main window are standard controls to start, stop and freeze the screen during sessions.
In the top-right you'll see the name of the device you've selected, and depending on the device there may be a button to open a device configuration dialog.
Here is the threshold screen:
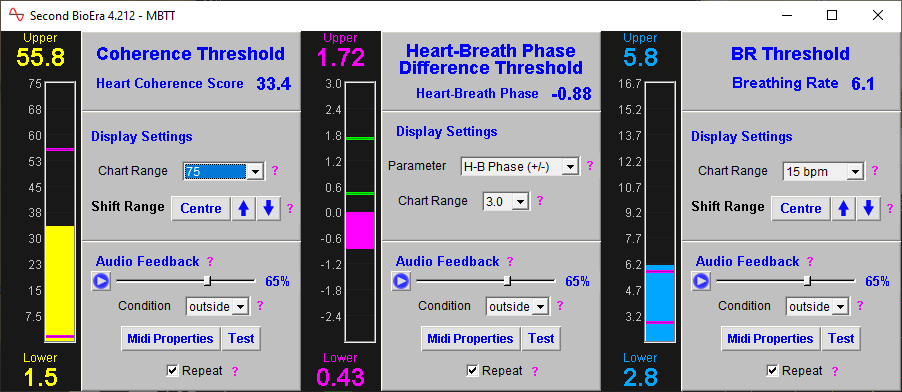
You see there are thresholds for three parameters. Each one has two levels which can be adjusted by dragging.
Here is the feedback window:
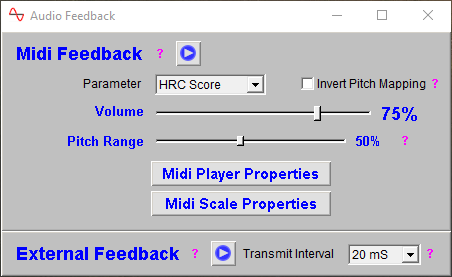
Audio feedback is covered in a sub-section below.
There is also a button, marked “External Feedback”, which starts / stops transmission of the feedback parameters out of BioEra for use by the external feedback utilities, which are described in section X below.
Event Marker
One of the standard control buttons in the top-left of the main window is a simple event marker. It has an icon that looks like an asterisk.
The idea is to mark periods or events of interest for later reference. Clicking the event marker causes a vertical line to be drawn in the Long Term chart (you can see an example in the main window figure above), and in addition a vertical line in the chart(s) of the Session Report (see below).
You may add a short note if you like. These are recorded for the Session Report.
Audio Feedback
The MBTT apps offer a number of different forms of audio feedback. For example the Heart Coherence app can play midi notes for each heart beat, where the pitch of the note varies with heart rate (or another of the app's parameters).
One form of audio feedback that is consistent across nearly all the apps is threshold-based contingent feedback. Again we'll use the Heart Coherence app as an illustrative example.
Here is the threshold control for breathing rate again:
In the bottom-right section, you can see threshold-based audio controls. When activated (by clicking the button) the software will play a note whenever the threshold condition is met. Depending on the 'condition', you can sound notes whenever BR goes above the upper threshold level, or below the lower, or either.
TO_DO video demo
6. Working with Breathing
Even independently of biofeedback, breathwork is becoming increasingly popular as a tool for therapy or for optimal performance training. The basis of this is the intimate connection between how we breathe and our mental and emotional states. Breathwork offers an ideal window for developing greater awareness of - even mastery of - the mind and emotions.
Adding biofeedback to the mix can turbo-charge the efficacy of breathwork.
Several apps within the MBTT suite measure breathing, usually in combination with other parameters such as muscle tension or heart rate. Examples include the Heart Coherence app, and the EMG & Breathing app. This makes it worthwhile to discuss breathing biofeedback in the present context.
There are three different measures of breathing used in MBTT apps:
- temperature of inhaled and exhaled air, measured by a temperature probe at the nostril
- movements of the chest and abdomen measured by a strain-gauge belt
- measurement of carbon dioxide concentration in exhaled air, by a capnometer or capnograph.
The latter is specific to the Capnometry module, and is not discussed further here.
The former two are broadly equivalent (i.e. generating similar data; a signal from which the software can detect inhalations and exhalations, and the turning points between them).
When you run one of the breathing apps, you can choose between them (assuming you have the sensors available to you). Personally my preference is for the temperature method; I believe it to be more robust and reliable.
Device Selection
As discussed above, you must select a device type as the source of the breath measure, and the list of options includes belt or temperature sensors. (The capnometer setting is separate.)
Breath Calibration
When you first start a breathing app, the software takes a few seconds to calibrate to the breath signal (20 seconds to be precise). During this time, the user should breathe smoothly and normally, not too slowly and avoiding long pauses.
Breath detection has a certain amount of “intelligence” programmed in, and if the breath signal is lost or shifts (e.g. if the sensor is moved or the breath itself becomes more subtle) the system will automatically recalibrate (again taking 20 seconds).
If you're not quite satisfied with the calibration, e.g. the breath trace doesn't look quite right), you can manually trigger a recalibration. This topic is covered in more detail in this guide to breathing measurement in Mind-Body Training Tools.
Breathing Biofeedback & Mindfulness Practice
Because of its close (and two-way) relationship to mental and emotional states, the breath is an ideal focus of attention in mindfulness and meditation practice - mindfulness of breathing is perhaps the most commonly taught meditation practice.
I believe breathing biofeedback has an important role to play in supporting meditation practice, enhancing its efficacy by making it in some sense easier and more gratifying. Whilst this is not the place to enter into a full discussion of this view, on a practical level there are at least two ways MBTT can support mindfulness of breathing practice: (i) “Breath Player” audio feedback and (ii) breath counting. The former is discussed later in this guide.
Breath Counting Functionality
MBTT's breath counting function offers a means of measuring and tracking mindfulness / meditation performance.
Mindfulness of breathing typically involves the instruction to count breaths, say up to ten, and then when you reach ten or if you lose track of the breath, to start again at one.
Researchers have suggested that tracking performance in counting breaths (i.e. how accurate is the trainee's count, how frequently to they reach ten, etc.) is the best, most objective way to track performance in meditation.
MBTT software is well placed to perform this kind of tracking (and doesn't get distracted!) All the breathing apps in MBTT, including the capnometry apps, have breath counting functionality - the controls are shown below:

Instructions for using this functionality are as follows:
- Start your biofeedback session, and select the target count - ten is traditional but hard especially if you're breathing slowly.
- When you're ready to begin counting, press the space bar, then count every full, completed breath after, till you reach the target.
- If you reach the target without distraction, press the space bar again. You'll immediately get a feedback sound telling you whether your count was accurate or not. Either way, start counting again at one.
- If you lose track of your count, hit the space bar again anyway, then restart your count. (You'll almost certainly hear the “wrong” sound.)
- The session report will summarise your performance over the whole session.
7. External Feedback Utilities
Each app in the MBTT suite offers simple visual and auditory feedback, for example in the form of parameter charts. However more specialised forms of feedback are also available, which require transmission of data out of BioEra.
The Platform program contains utilities designed to read this data and use it for specialised feedback.
(Technical note: to transmit data, BioEra uses a technology called TCP/IP which is the basis for internet communications. In principle it's possible to develop other programs to read and utilise this data - this may be of interest to technically minded users.)
At the time of writing there are three external feedback utilities built into MBTT. They can be launched using buttons located in the Set-up tab of the Platform program, and are described below.
More options are provided by other software products, for example Brain Assistant, a neurofeedback gaming software.
The “Shadow” Feedback Utility
In the earlier section on feedback, I gave the example of a video which brightens or darkens proportionally with the variation of the selected feedback parameter. This form of feedback is implemented using the Shadow utility.
It works by creating a window which has variable opacity. You position this window over the top of another program running on your computer, for example a web browser showing a YouTube video, or a DVD player. Then, during a session, the underlying window is proportionally revealed or obscured as the shadow window varies its opacity.
The Shadow Utility is described in more detail here.
The Beat Player
The Beat Player utility generates audio feedback in the form of a rhythmic sound or beats. In addition you can use it to turn your computer monitor into a kind of strobe light, i.e. giving rhythmic flashes of light. In other words, the beat player is a kind of software Light & Sound machine, or Audio-Visual Stimulation (AVS) device, with the difference that the stimulation can convey feedback by varying pitch, volume or light intensity.
WARNING: YOU MUST NOT USE THE BEAT PLAYER IF YOU (OR YOUR CLIENT) IS PRONE TO SEIZURES, OR SENSITIVE TO STROBE-EFFECT LIGHTING.
Technical note: the audio beats are known as isochronic beats; the beat player can also be configured to play binaural beats (requiring headphones).
Beats and pulsed light may affect brain / mind state by causing entrainment, where EEG rhythms follow the pulsed stimulation. Alternatively AVS may possibly cause effects on the brain via dis-entrainment, or the suppression of EEG rhythms.
The Beat Player Utility is described in more detail here.
The Breath Player
The Breath Player is designed to give audio feedback in breathing training. It works by generating a tone which mirrors the breath - gently rising and falling in pitch and volume in step with the user's breath.
The Breath Player can directly follow the breath as measured by a biofeedback device, or it can be used as a breath pacer, whereby it generates a sound (with a fixed breathing rate, for example) that the trainee can follow.
This kind of feedback can be particularly useful when training in a meditative way, and particularly when the meditative focus is the breath (i.e. “mindfulness of breathing” practice). The feedback can be presented when the trainee has closed eyes, and it is designed to be unobtrusive, avoiding the need to divide attention between breath and biofeedback.
The Breath Player Utility is described in more detail here.
8. Report Functionality
Mind-Body Training Tools allows you to generate session reports and application reports.
MBTT reports are in html format, which is the format used by web pages. This means that reports are opened and read using any web browser such as Google Chrome. MBTT opens reports in your computer's default browser.
Because they're written in html, reports can be read by anyone with a web browser - once generated, you don't need MBTT to read them, and thus you can email them for others to see or even upload them if you wish.
Each module interface has buttons for report generation. See for example the HRV module interface, shown above and again below.
(Most other module interfaces are essentially the same.)
First, select the particular application for which you'd like to generate a report.
There's a button to generate a session report. A session report shows charts and tables for the feedback parameters summarising the whole session, so that you can see progress over the session.
You'll be prompted to select a particular session, and then you'll see an options dialog. The figure below shows options for the Heart Coherence application.
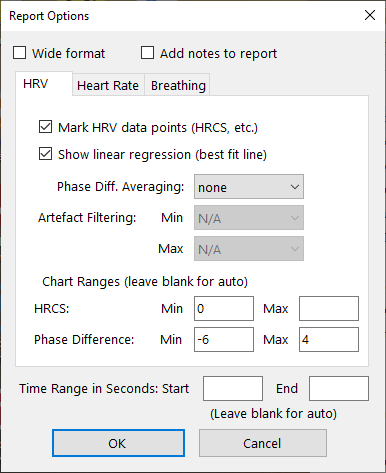
Most of the options should be self-explanatory. Broadly they allow the user to:
- set a preferred level of smoothing or averaging
- exclude data which you consider to be “artefact” - either too high or too low to be considered valid
- restrict the ranges shown in the charts to highlight regions of interest.
You can also add notes which are recorded (by checking the option).
You can see a sample session report (for the Heart Coherence app) here.
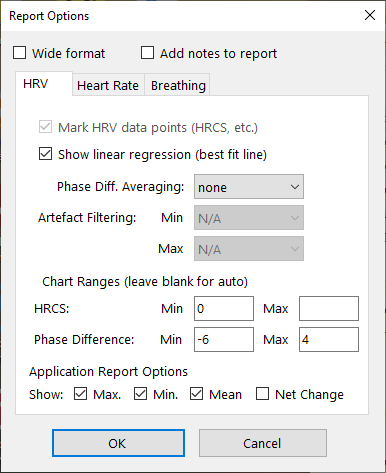
You can generate application reports, which summarise all your recorded sessions. They contain charts for each parameter used in the application, so you can see your progress over the longer term. Typically for each parameter, the software generates line charts for session means, session maxima and session minima.
Again you'll be offered an options dialog so you can configure what the report shows. The dialog for the Heart Coherence app is shown below.
You can see a sample application report (for the Heart Coherence app). TO_DO
9. Managing Session Data
We've seen that MBTT saves session data so that you can generate reports or replay sessions. Over time you can build up a lot of data, and you may wish to take steps to manage this, for example by deleting or archiving sessions.
Each module interface has a button to manage session data. Clicking this opens a dialog, like the one shown below:
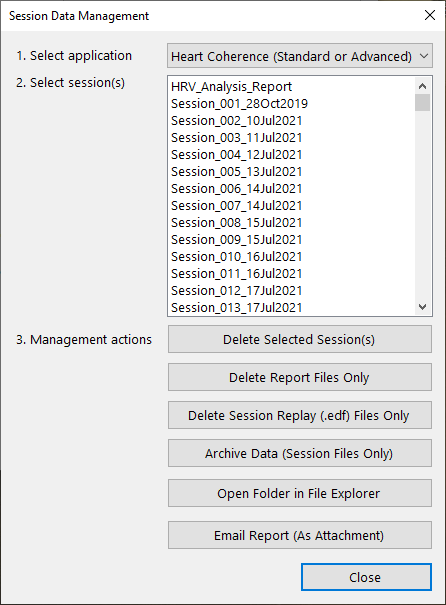
You can select one or multiple sessions in the list-box.
The buttons in this dialog offer you these functions:
- You can delete all sessions completely, meaning all files associated with the session.
- You can delete report files only, to save space. Reports can be regenerated of course (though your notes will be lost).
- Delete session replay (.edf) files - these are much larger than the text summary files.
- Archive sessions, meaning they a moved to a sub-folder so that they wouldn't be included in application reports, and wouldn't be listed in the dialog when you create a new session report.
- Open the folder containing all the data files, using Windows File Explorer.
- Email particular reports - this requires you to enter details of your email server which you'll need to ascertain.