EEG Neurofeedback Training Application User Guide
Contents
- Introduction
- Running a Session Using the Neurofeedback App: Overview of Practical Steps
- The BioEra Neurofeedback Training App
- Thresholds in the Neurofeedback Training App
- Feedback
- Report Functionality
Introduction
This guide introduces the EEG neurofeedback training application, part of the Mind-Body Training Tools suite.
Neurofeedback is a way of training the brain towards improved functioning, or better “performance” in some sense - this may mean increased emotional well-being, better regulated sleep, or improved focus and concentration, for example.
The aim of this guide is to show you how to use Mind-Body Training Tools to run neurofeedback sessions. It does not teach you how to neurofeedback from scratch. To access the full power of neurofeedback is a serious undertaking requiring an investment in learning.
Neurofeedback has been used as a therapy for psychiatric and neurological conditions. Please note, Mind-Body Training Tools makes no claim to be a medical product in any sense, nor does it claim to diagnose or treat any medical (inc. psychiatric or neurological) disorder.
Running a neurofeedback session requires the practitioner to make at least two key decisions:
- what protocol to employ
- what form of feedback to use.
Neurofeedback Protocols
In neurofeedback, “protocol” means the decision of:
- what particular EEG parameter to train (e.g. amplitude of the alpha frequency band)
- whether you want to enhance it or suppress it (i.e. train up or down)
- where on the head you wish to train it (including how many channels of EEG to use in training).
(Arguably a fourth element that defines a protocol is how long to train (within a session) and how to structure this time, e.g. 6 blocks of 2-minute training bursts, with rests between.)
In Mind-Body Training Tools, a protocol is represented in the software as a named entity. There are many to choose from, or you can create your own. To run a neurofeedback session, you must first select a protocol.
Selecting the most appropriate protocol for an individual trainee is key to neurofeedback. It's beyond the scope of this user guide, and should be covered in a neurofeedback training programme. We can summarise by saying that an appropriate protocol selection should be based on both the trainee's personal goals (and issues they want to overcome), and the traits found in their EEG (assessment) which relate to their goals.
Feedback
Feedback in its most general sense is information about how well you're performing some particular skill, that enables adjustments and improvements to the performance based on learning.
More specifically, in neurofeedback training, feedback is what the software presents to the trainee to see or hear. Changes in this feedback convey the information that enables learning.
Feedback can be visual, e.g. a graph that goes up or down, or a video, or a game. Or feedback can be auditory – a sound with varying volume or pitch.
A key principle of feedback is that it should (ideally) help to motivate the trainee in some way, i.e. it should incorporate a reward for “success”. For example, in simple video feedback, the video plays when the trainee is in the desired neurophysiological state, and stops when he drifts out of that state. The feedback should be pleasant, or pleasing in some sense. Having this experience of reward facilitates learning, or makes it more efficient.
Whatever the medium of feedback, there are different classes of feedback:
- Dichotomous or Stop-go – our video example above is like this. Either the video is playing (when the parameter is above threshold) or it is stopped.
- “Points-based”. Feedback is a discrete event, such as the scoring of a point in a game, or a “pacman” eating the next cheese. The feedback event is triggered by the training parameter crossing the threshold (e.g. alpha amplitude exceeds 20uV).
- Proportional. For example suppose video is the medium of feedback, but this time the image brightness varies over a range. Instead of a discrete feedback event, (e.g. starting or stopping) the feedback is continuous but varies smoothly over a range. The video can be bright or dark or anywhere in between. This form of feedback mirrors the training parameter which also varies over a range.
There is no clear consensus in the field of neurofeedback as to which form works best. Probably a big factor is the personal preference of the trainee (whatever is the most engaging and motivating is likely to work best). Mind-Body Training Tools Neurofeedback app offers all three forms.
Thresholds
Neurofeedback software must translate EEG parameters, or more specifically changes in EEG parameters, into feedback that is presented to the trainee's senses. Thresholds are software tools, that enable you to configure this mapping, meaning they define how much of the parameter results in how much feedback.
A “threshold level” is a marker of how much of the training parameter is enough to trigger feedback. This is perhaps easiest to grasp in the case of points-based feedback or stop-go feedback: when the parameter exceeds the level, a point is scored or the video starts playing. (You can of course train a parameter downwards, which would mean a point is scored when the parameter goes below the threshold level.)
Appropriate setting of threshold levels is key to using neurofeedback effectively. The main principle is that feedback should be balanced: not too challenging for the trainee, and not too easy.
In MBTT, you can set the levels “by hand”, or the software can calculate updates based on recent EEG data, and on criteria that you set.
General Set-up Before Neurofeedback
This guide assumes you have installed the software and you're acquainted with MBTT's general usage. If not, please read the Installation & Set-up User Guide and / or the Guide to Working with Mind-Body Training Tools Apps.
User and Data Storage Set-up
From the Set-up tab of the Platform, you can select a user, or stay with the Default User. If you're a professional practitioner with multiple clients you should set up named users for each of your clients so that you can keep track of the progress.
Hardware Set-up
Again from the Set-up tab, you should select what kind of EEG amplifier you're using. One option is to use “simulator” (which simply plays back recorded EEG) - this is recommended when first learning to use the software.
Note that different devices have various numbers of channels available, from one to eight. The decision as to how many channels to work with is made when you configure the protocol.
Running a Session Using the Neurofeedback App: Overview of Practical Steps
This section explains how to operate the MBTT neurofeedback software in running a training session.
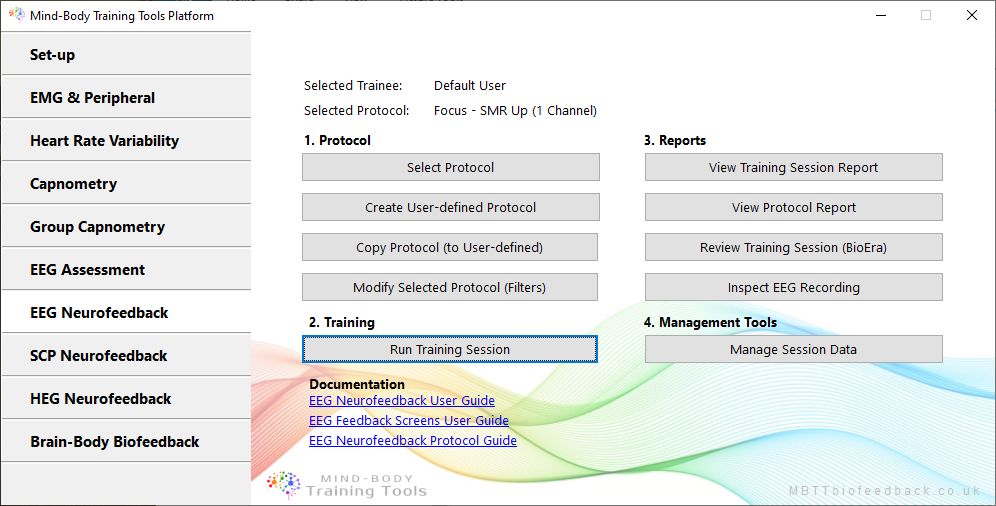
The starting point for running a neurofeedback session in MBTT is the Platform program, and the EEG neurofeedback tab:
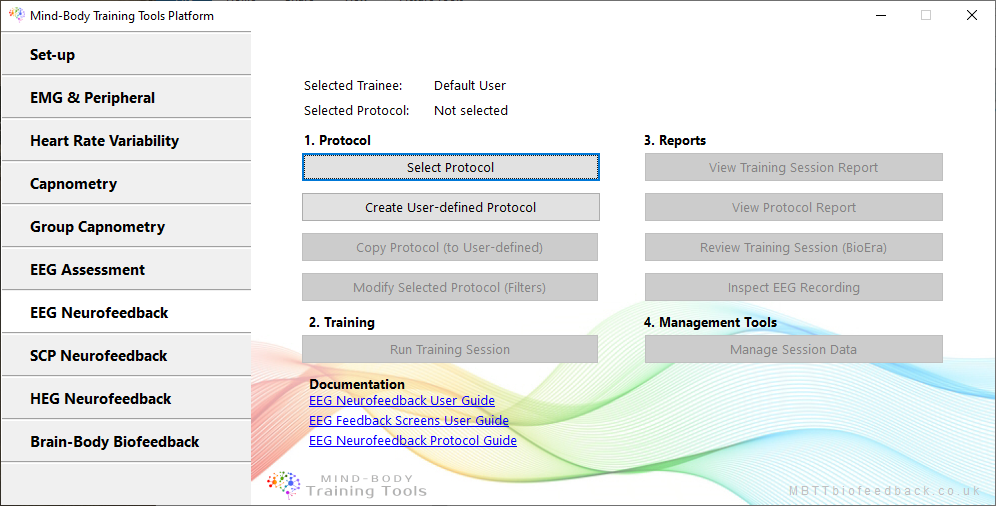
The buttons here are organised according to the logical phases of a neurofeedback session:
- configuring a protocol
- running a neurofeedback session using the BioEra app
- assessing how the session went using reports.
Configuring A Protocol
The MBTT neurofeedback software is designed in such a way that you can't run a session without having selected a named protocol first. You can select a preconfigured protocol or create a new protocol.
Selecting a Preconfigured Protocol
The simplest way to get up and running is to select a preconfigured protocol. Clicking the ‘Select Protocol’ button opens up a selection dialog listing all available options:
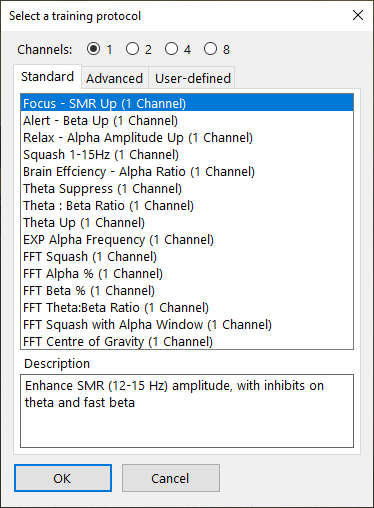
The first task is to decide how many channels of EEG you wish to work with (you can't change this on the fly). Most of the preconfigured protocols exist as several versions differing in terms of number of channels. It's important to realise as far as the software is concerned they are distinct. For example if you create a protocol report (to gauge progress) the report will only show sessions using a fixed number of channels, it does not combine e.g. one and two channel sessions.
About the MBTT Preconfigured Protocols
MBTT comes with a wide range of preconfigured protocols that you can select from. Each computes a different parameter as the main feedback parameter. Some are amplitudes of specific frequency bands, such as alpha, calculated using digital filtering - this type of protocol is most common in the neurofeedback world. Other protocols use FFT or spectral analysis to compute parameters, such as the squash protocol or alpha percentage by FFT protocol. These are more experimental.
Many of the MBTT protocols have a standardised form in which there is one main feedback parameter, for example SMR amplitude. (These are listed under the ‘Standard’ tab, see the dialog above.)
Others are more advanced, having more than one feedback parameter, or a specialised form of feedback, or both. An example is the Alpha-Theta Crossover protocol.
A separate guide covers the individual MBTT EEG neurofeedback protocols in more depth.
Creating a New Protocol
A more advanced usage of MBTT is to create a new protocol. You may wish to do this if you're a professional practitioner, and wish to have client-specific protocols (which allows you to adjust the protocol as you see fit, but keep the changes specific to one client).
The easiest way to create a new protocol is to select a preconfigured protocol and then copy it to a new named “instance” for example “SMR for F.Bloggs”.
First select a preconfigured protocol as above, then click the ‘Copy Protocol’ button which will open a new dialog window:
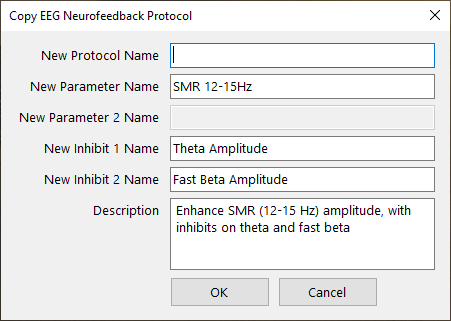
Simply complete the required fields and proceed.
A second way is to create a protocol from scratch. This is more limited but viable for simple protocols. Clicking on ‘Create User-defined Protocol’ will open another dialog:
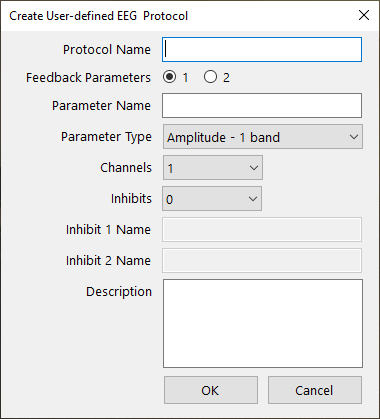
Once a new protocol is created, you can re-select for future sessions by clicking ‘Select Protocol’ and then going to the User-defined protocols tab.
Once a protocol is configured, you'll see it's name displayed (below the user name) and all the other buttons in the user interface are enabled.
Running A Neurofeedback Session
After setting up your protocol, click the ‘Run Training Session’ button. This opens a further dialog window:
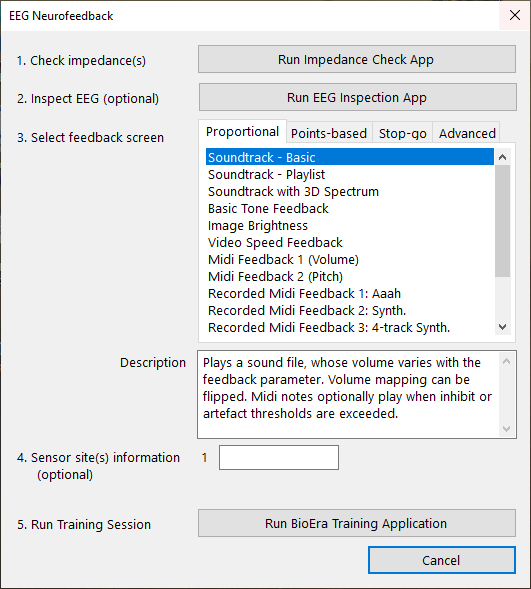
This dialog outlines the next five steps.
Steps one and two are about checking you have a good quality signal before starting training. You can check your impedances (depening on what device you're using) and / or you can inspect the raw EEG. Both these steps involve starting a BioEra app which reads data from your device.
The EEG inspection BioEra app looks like this:
(Defining what makes for an acceptable EEG signal is beyond the scope of this guide.)
Step 3 is to select a feedback screen from among the available options (in the list-box). Discussion of these feedback screens is deferred to a later section.
At step 4 you can optionally enter what site(s) you are training at. This is simply recorded for report generation - the software doesn't run any differently when you train at one site or another or even leave this setting blank.
(If as a practitioner you did want to train the same EEG parameter at different sites, there is a case for creating different named protocols for each site; it's up to you as the user.)
Finally, at step 5, launch the actual training session by clicking ‘Run BioEra Training Application’.
The BioEra Neurofeedback Training App
In keeping with the other apps of the MBTT suite, the EEG Neurofeedback Training app has three windows:
- Main window, or trainer's window, containing parameter charts.
- Threshold window - each app has at least one threshold, but there are usually more.
- Feedback window - in a sense, all charts and thresholds are giving feedback, but the feedback window contains controls for audio feedback plus more specialised feedback forms.
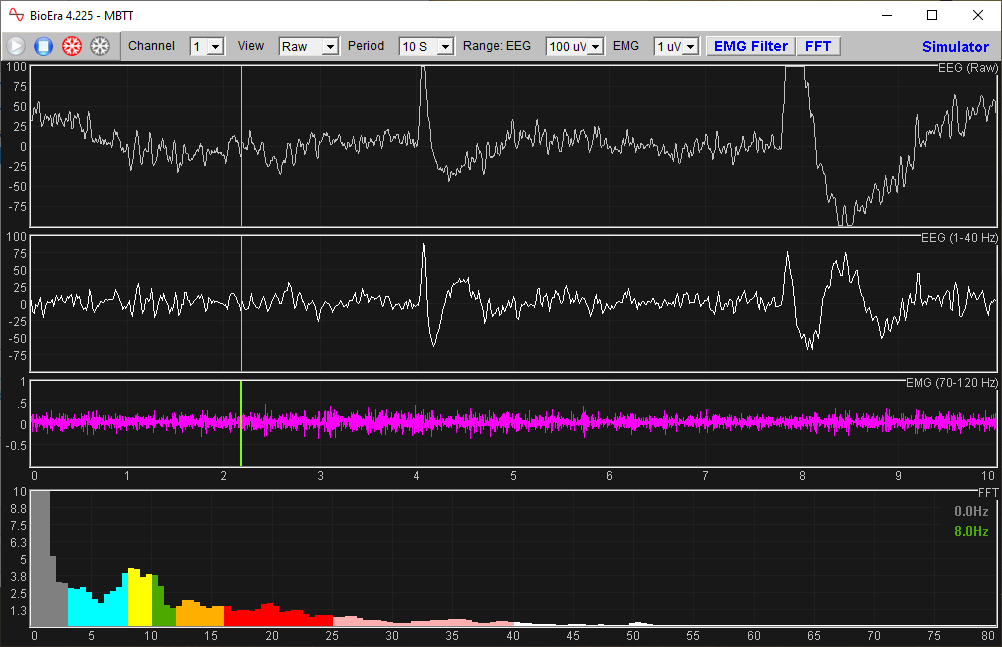
The main window looks like this:

The four charts show (from top to bottom):
- Raw EEG trace
- Spectral analysis (FFT) of the EEG
- Standard band (delta, theta, alpha, beta) amplitudes trend (over a period of a few minutes)
- Training parameter (i.e. feedback parameter) trend.
All four displays can be adjusted to suit your preferences (e.g. you can change scales).
The dark blue block that you see in the lower two charts represents a single training period - this concept is explained below.
Training Periods
In the MBTT Neurofeedback app, training is divided up into discrete segments referred to as training periods. This means that the trainee is not actively engaged the whole time that a session is running, but rather in short bursts with rests in between. A neurofeedback session thus consists of several training periods interspersed with inactive periods.
You can set a duration for each training period, and you can change the duration whenever you like. For example, a session could consist of six three-minute active training periods, or three three-minute periods and two five-minute periods, or even if you prefer, a single period lasting twenty or thirty minutes.
The design intent is to allow rests for a trainee who is working with an activating protocol, but also to allow time when a neurofeedback coach can talk with the trainee about their experience, and perhaps to offer further coaching or adjust the protocol in some way.
The implication is that feedback is only active during a training period. When you first click the ‘Play’ button to activate the flow of data from the device, feedback is not initially active - you must click another button, ‘Begin Training’, to start a training period and make the feedback screen become active.
The controls for training periods are located in the very top row of the app:

Each new training period must also begin with this button-click - rest intervals can be as long (or as short) as you like.
EEG data will still be recorded throughout a session, and will be all data will be shown in session reports (with training periods highlighted).
Artefact Detection
Effective neurofeedback depends on recording clean EEG data that is as free from artefact as possible. Artefact means any component of the measured signal that doesn't come from brain activity, for example eye blinks or muscle tension. This guide doesn't cover sources of artefact, but it does explain the artefact detection features of the MBTT neurofeedback app.
The neurofeedback artefact detection is similar to that available in the MBTT EEG Assessment Module app which is described in more detail in this user guide.
Notice that the raw EEG trace at the top of the main window has a dotted line above and below it. This represents a kind of threshold for artefact - when the signal crosses the threshold, it's judged as artefact. Here is an example of an eye-blink artefact (in this case recorded by the MBTT assessment app).

You can adjust the position of this threshold (dotted line) by dragging with your mouse the small bar at the left side of the raw trace.
You can catch muscle tension artefact in a similar way. By clicking the ‘EMG’ button below the raw trace, you can view a trace showing high frequency activity (which is how muscle tension shows up in EEG). You can adjust the threshold level in the same way.

What happens when artefact is detected? How does the software adapt?
Firstly, you should check the box labelled ‘Artefact’, below the raw signal - otherwise the software will ignore artefact.
With this option selected, the software blocks the normal calculation of the feedback parameter(s). You will see the bar charts of the thresholds (see below) “freeze” when this happens. Feedback is likewise frozen, meaning it stays in the same state. It doesn't mean that feedback gets switched off or anything like that. It does mean you can't score points by producing artefact - that's the design intent of detecting artefact.
Spectral Analysis or FFT Display
The FFT chart presents a view of the frequency make-up of the EEG at any point in time (that is, how much activity is in the delta range, theta range, alpha range, etc.). This guide does not go into details of signal processing methods such as FFT - that would be for a practitioner training programme.
You can make adjustments to the way FFT is calculated - click the button ‘FFT’ just below the raw signal at the right, to open a new dialog.
I suggest it's a good idea to play around with these settings, perhaps using the simulator mode, as the best way to learn what they do.
Note that the FFT calculation is also affected by the sample rate of your device.
Thresholds in the Neurofeedback Training App
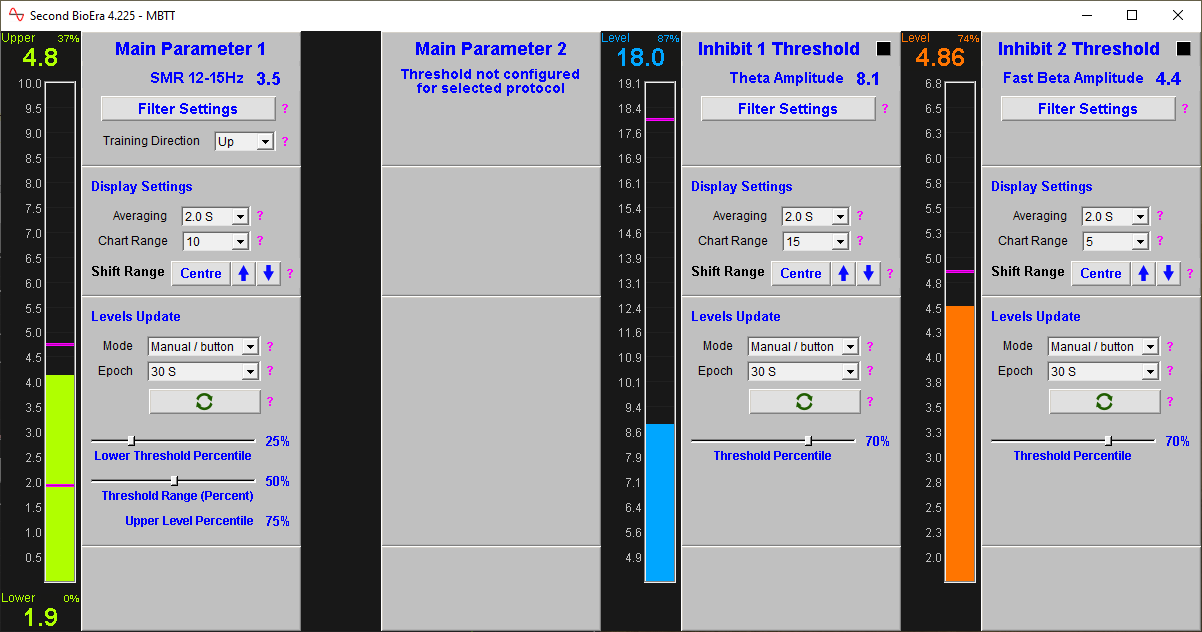
The second window of the neurofeedback training app shows thresholds:
Recall that in neurofeedback, EEG parameters are mapped into visual or auditory form, so that the trainee can perceive changes directly through his senses. There are different forms of feedback; one example is continuous and proportional feedback, such as a tone whose pitch and/or volume varies with the parameter, or a video whose brightness is proportional to the feedback parameter.
Thresholds are software tools, a means of configuring the mapping, meaning they define how much of the parameter results in how much feedback.
In the MBTT software, a threshold consists of a bar graph with one or two levels or bars, plus a set of controls.
The number of thresholds you see depends on which protocol you've selected. The most basic thresholds have only one. In the example above the protocol is SMR up-training, and there are three thresholds. One threshold is for the main feedback parameter, SMR (or slow beta) amplitude, while the other two (to the right) are of a secondary type, inhibit thresholds (more on these below).
Here is the main parameter threshold again:
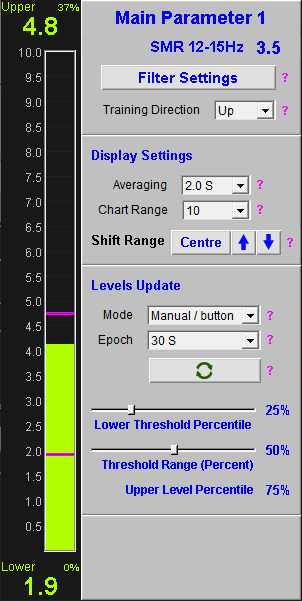
(The two levels are the magenta-coloured bars, and at the top and bottom you see displayed the parameter values at which they are currently set.)
Having two levels may seem to complicate things, but it opens up the ability to offer genuinely proportional feedback.
An example of proportional feedback is using a “shadow” to darken or lighten a video. The video's brightness can vary smoothly between a maximum and minimum. The two threshold levels define the maximum and minimum brightness points.
The controls on the right side of the figure can be used to:
- Adjust the settings of the feedback parameter such as its frequency range (in the case that it is a band amplitude such as SMR).
- Set the direction of training for the protocol (up or down - more or less of the parameter).
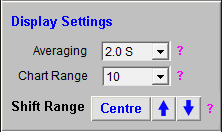
- Configure the amount of averaging or smoothing (over time) of the feedback parameter.
- The range or scale of the bar chart. The scale can be increased if the signal tends to vary above or below the bounds of the chart, and decreased when the variability of the signal appears low. The signal can also be shifted up and down while keeping the scale fixed, using buttons.
- Set how and when the threshold levels are to be updated.
The positioning of the levels or bars in the chart is key to using thresholds effectively.
The main principle is that feedback should be balanced: not too challenging for the trainee, and not too easy. The range of variation should be not so great as to be chaotic and not so narrow as to be uninformative.
In the example of video brightness feedback, shifts in brightness should happen at a reasonable frequency (periods where nothing is happening are frustrating and lead to inefficient learning) and at the same time, reasonably smooth.
The simplest way to move the threshold levels is to drag them with your mouse, but it's also possible to have the levels update automatically.
Updating Threshold Levels
The control box labelled ‘Levels Update’ determines how the levels update.
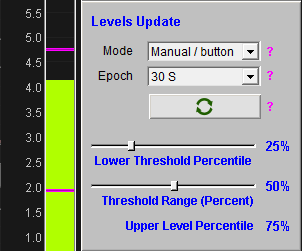
The ‘Mode’ drop-down has two options:
- in auto-continuous mode, the levels can update continuously, being calculated by the software, based on criteria that you set.
- in manual mode, the levels stay fixed until you either drag them with your mouse, or you click the Update button.
Levels Calculation
How does the software calculate a new threshold level, either for continuous update or for button-controlled update? To understand this, we need to explain two key concepts, epochs and percentiles.
Threshold Epochs
The calculation is based on how the parameter has varied over a recent period of time, called an epoch. An epoch might be 30 seconds in length, or a minute, or more - you can set the duration using the drop-down control.
Percentiles
The concept of a percentile is widely used in data analysis and statistics.
Suppose you measure a parameter such as “alpha amplitude” over an epoch of say 10 seconds, using a sample rate of 100 (meaning the threshold software receives 100 numbers per second). That gives 1000 numbers, all representing alpha amplitude at different points in time.
The software will sort these 1000 numbers from smallest to largest.
Suppose you set your threshold level to be at the seventieth percentile. Put simply, it means the parameter was below this level 70% of the time, and above it 30% of the time. The software calculates this level by taking the 700th number in its ordered list from smallest to largest.
This ordered list is always based on the most recent period of time, and has to be continuously updated by the software. That's why the seventieth percentile itself continuously changes.
In the same way, the twentieth percentile is the level below which the parameter spends 20% of the time, and above 80%.
Percentile Controls
The controls to set what percentiles to use for the calculations are two sliders:
- the range slider sets the difference in percent between the upper and lower levels
- the second slider sets the lower level.
The upper percentile is thus the sum of the lower level percentile plus the range - it is also displayed for convenience.
Proportional Video Feedback Again
Returning to our earlier example of using proportional brightness feedback in conjunction with a video. Suppose we're training EEG SMR amplitude upwards. In our SMR threshold, we could set the threshold range to be 50% - this means the upper and lower levels are 50 percentiles apart. We could set the lower level to be at the 25th percentile, and this would put the upper level at the 75th percentile.
Roughly speaking, these settings would mean the video would play at full brightness for one quarter of the time, and maximum darkness for another quarter of the time. The remaining time (i.e. half the time) it would be somewhere in between.
Current Percentiles of Threshold Levels
When the threshold levels are not continuously updating, it means that they don't necessarily reflect the percentiles at which they were first set.
Suppose you're doing an EEG neurofeedback session, and you start by setting your threshold levels to the 25th and 75th percentiles, based on 1 minute of “baseline” data. Suppose further that after 10 minutes of training, you've shifted your EEG by a significant degree. Now, the 25th and 75th percentiles based on the most recent 1 minute of data will be different from what they were at the start of training.
(If you were to click the Update button, you would set the levels jump to a new place.)
The software estimates the current percentiles of the levels, based on the most recent data. These are shown as small numbers in the corner of the numeric displays that show the current level values. This information might inform your decision as to how and when to update the levels.
Best Strategies for Updating Threshold Levels
Of all the different ways to update threshold levels, what is the best way? What do the experts recommend?
This question is a topic for a training programme in neurofeedback, beyond the scope of this guide. A simple starter strategy might be to start the training session with a “baseline” period, without feedback or active training. The mode of the thresholds at this stage should be ‘manual / button’. The practitioner can then click the update button to set the levels for the remainder of the session.
Another important principle would be to ask the trainee (if you're training another person) or go by your experience if you're training yourself. Does the feedback like it's too challenging or too easy to achieve reward? Or just right?
Threshold Chart Range Controls
In the threshold example above, you see a box with controls for adjusting the bar chart display - you can set the (vertical) range or scale of the parameter. You can also adjust the signal up or down in the chart without changing the scale, using the three buttons (centre, and up and down arrows).
Between them these controls are useful when the parameter changes enough to take it out of the displayed range.
Please note, shifting the range of the parameter bar chart in the threshold also updates the long-term parameter trend chart range.
Adjusting Parameter Settings
From the threshold controls, it's possible to adjust the way the feedback parameter is calculated. For example, if the parameter is a frequency band amplitude (calculated via digital filtering) it is possible to change the frequency range (upper and lower limits). To do this, click the button ‘Filter Settings’ - this opens a dialog giving access to properties of the filter:
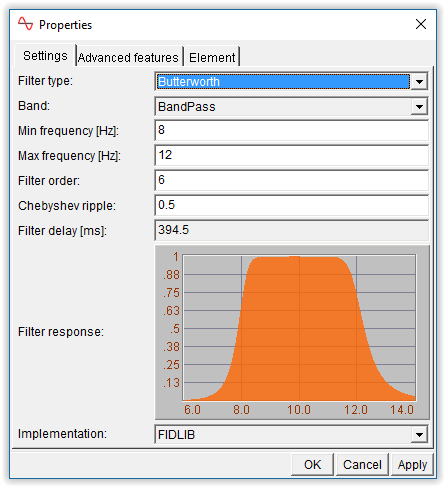
(Explaining what each property means, is beyond the scope of this guide.)
If the protocol is based on something other than digital filtering, e.g. FFT, the dialog will be different.
Inhibit Thresholds
Generally in neurofeedback, “inhibiting” a parameter means training it down. In this sense, any main threshold could be said to be an inhibit threshold if you're training down, for example as in the squash protocol.
However, in MBTT software, inhibits have a more specific meaning. For an inhibit threshold, the parameter doesn't itself translate directly into feedback. Instead, the state of inhibit parameters modulates the feedback of the main training parameter.
An example will help clarify the design intent. Suppose you're training alpha activity. What you want to achieve is increased alpha amplitude but without at the same time also increasing other frequency band amplitudes, in other words you want to increase alpha while keeping theta and fast beta relatively low.
In this case, neurofeedback software should reward increasing alpha only, NOT increased amplitude across the whole spectrum. For this you need inhibit thresholds. You would use inhibit thresholds for the bands you want to keep in check - theta and fast beta in my example.
In terms of feedback, you don't necessarily need to directly feed back theta or fast beta activity. But the software should NOT reward alpha when theta or fast beta is too high.
In the thresholds window shown above, there were two inhibits, on the right side. Here they are again:
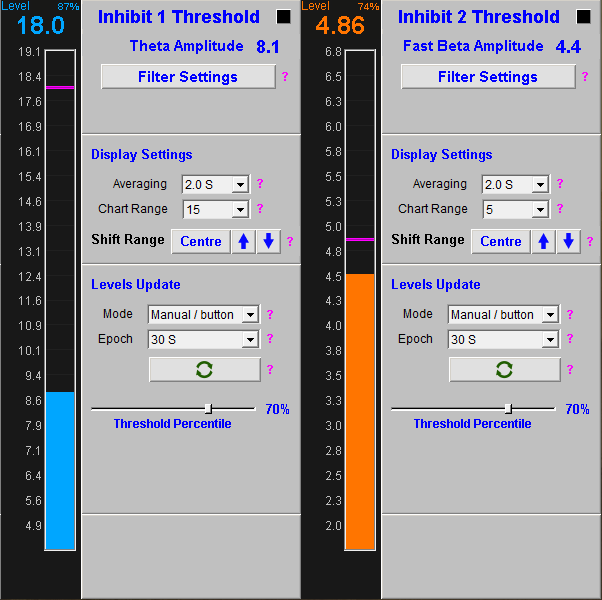
You see there are differences to main thresholds. The key difference is there is only one threshold level (magenta bar in the chart). When the inhibit parameter is above this level, the main feedback parameter is not rewarded.
Other features are the same or similar:
- You can adjust the frequency range or settings for the parameter.
- You can shift the range / scale of the bar chart.
- You can adjust the level by hand or automatically based on a percentile (set with the slider control) and you can have the level update continuously or only when you click update.
In some ways inhibits are like artefact detectors.
In general you don't need inhibits when you're down-training. Quite a few of the MBTT preconfigured protocols don't have any.
Feedback
Recall what was said about feedback in the introduction: feedback is what the software presents to the trainee to see or hear. Changes in this feedback convey the information that enables learning.
Feedback can be visual, e.g. a graph that goes up or down, or a video, or a game. Or feedback can be auditory – a sound with varying volume or pitch.
Whether visual or auditory, feedback can be classed according to three types:
- Dichotomous or Stop-go – for example a video is playing (when the parameter is above threshold) or it is stopped.
- “Points-based”. Feedback is a discrete event, such as the scoring of a point in a game, or a “pacman” eating the next cheese. The feedback event is triggered by the training parameter crossing the threshold (e.g. alpha amplitude exceeds 20uV).
- Proportional. For example suppose video is the medium of feedback, but this time the image brightness varies over a range. Instead of a discrete feedback event, (e.g. starting or stopping) the feedback is continuous but varies smoothly over a range. The video can be bright or dark or anywhere in between. This form of feedback mirrors the training parameter which also varies over a range.
Mind-Body Training Tools Neurofeedback app offers all three forms. You need to select the form of feedback you want at the start of the session. You can't change it on the fly - that said, it is simple enough to end a session and start a new one.
Selecting a Feedback Screen
Recall that step 3 of the EEG neurofeedback training session dialog asks you to select a training screen. Here is the dialog again:
Note the tabs at the top of the list box - feedback screens are grouped according to the type: proportional, points-based or stop-go. (Advanced screens generally offer a combination.)
As you see there are quite a few to choose from. They are described in a separate EEG Feedback User Guide. Here we'll show a couple of examples only.
The Basic Soundtrack Feedback Screen (Proportional)
In this example, the feedback is auditory and proportional. A soundtrack is played, whose volume varies with the feedback parameter.
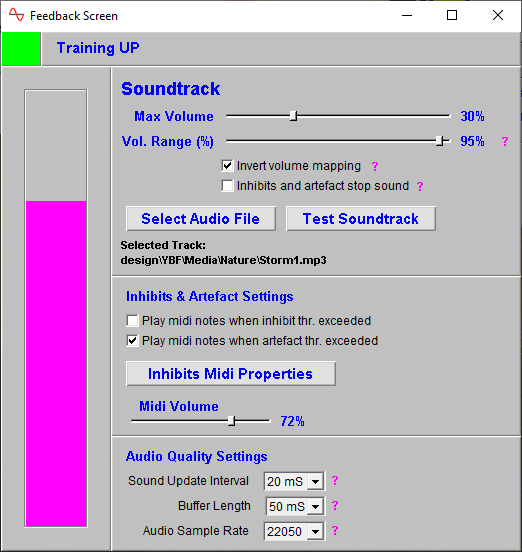
The bar graph that you see on the left, in keeping with other feedback screens, is scaled so that the top of the bar is equivalent to the upper threshold level, while the bottom is equivalent to the lower level.
You can select an audio file to use for feedback - note that it is played in a loop. You can test the soundtrack outside of a training period by clicking the ‘Test Soundtrack’ button. (Recall none of the feedback modalities are active until you begin a training period.)
During training, the soundtrack volume varies between a minimum and a maximum, these points corresponding to the threshold levels. Aside from feedback changes, you can scale the volume (set a maximum) using the Max Volume slider control.
You can in effect set the minimum volume using the Volume Range slider. Setting this to 100% means that the volume varies between the maximum and zero, or in other words, the sound goes completely silent when the parameter is at or below the lower threshold level. This is not necessarily the most desirable option - silence may be experienced as frustrating or disconcerting by the trainee. Setting the range to say 90% would mean the soundtrack plays continuously, but at times very quietly.
Audio Quality Settings
At the bottom of the window are three drop-down controls for audio quality settings - these actually are more to do with feedback latency. Latency is the lag between an EEG event in the brain, and it's appearance in the feedback. There is inevitably some delay due to the need to measure and process the data, but ideally latency should be minimised.
When your computer plays a soundtrack, the sound card is sent packets of audio data one after another - these are called buffers. Neurofeedback software needs to compute the contents of one buffer, with data based on both the audio data and the current EEG, while another plays. As soon as one buffer has been calculated, it is sent and the next one is computed.
To minimise latency, or the time lag between an EEG event and its feedback as sound, buffer duration must be minimal. Set it to a value as low as possible - if you set it too low the audio will sound distorted by crackles.
The sound update interval is the interval between calculations of volume - it should be less than or the same as the buffer length.
Soundtrack Selection
The MBTT EEG Neurofeedback module comes with a selection of short tracks that you use, but you can also use your own - indeed this is to be encouraged as mp3 files can be bought online for low cost and will probably be more suitable.
The EEG Training Module Feedback Screens Guide has more to say about how to choose a suitable track, and even how to edit it so that it can be played in a loop.
The Midi Notes Progression Feedback Screen (Points)
In this example, the feedback is auditory and points-based. When a point is scored, a midi note is played, each successive point giving a higher pitch.
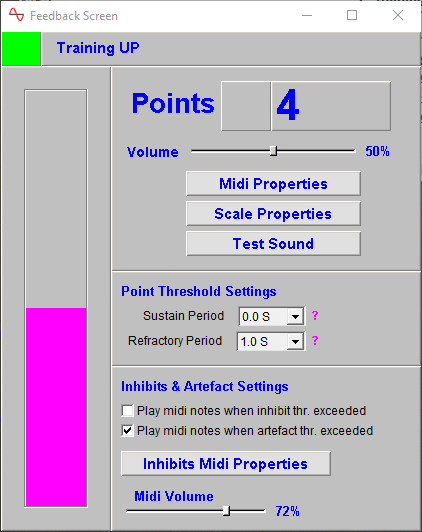
The bar graph that you see on the left, in keeping with other feedback screens, is scaled so that the top of the bar is equivalent to the upper threshold level, while the bottom is equivalent to the lower level.
Point Threshold Settings
The points-based screens have a couple of drop-down controls that are specific to points scoring:
- Sustain Period - setting a non-zero value means that the training parameter must stay continuously above the threshold for the set length of time, before a point is scored. Clearly this makes points more challenging to score.
- Refractory Period - this is the interval of time immediately after a point has been scored. During this interval further points cannot be scored. It gives the brain time to appreciate its reward then reset, so to speak.
Report Functionality
Mind-Body Training Tools allows you to generate session reports and protocol reports. The purpose of reports is to allow you to gauge progress, and if necessary make changes to the training plan.
The controls for report generation are found in the platform window, in the EEG Neurofeedback tab shown shown earlier and reproduced here:
The report buttons are in section three on the right. (You need to have selected a protocol for them to be enabled / active - all reports are protocol specific.)
A session report shows charts and tables for the feedback parameters summarising the whole session. You'll be asked to select one particular session, and given report options. You can also add notes which are recorded.
The application report shows the variation of the feedback parameters across multiple sessions. Typically for each feedback parameter, the software generates line charts for session means, session maxima and session minima.
You'll be offered the opportunity to set some options for the report via a dialog:
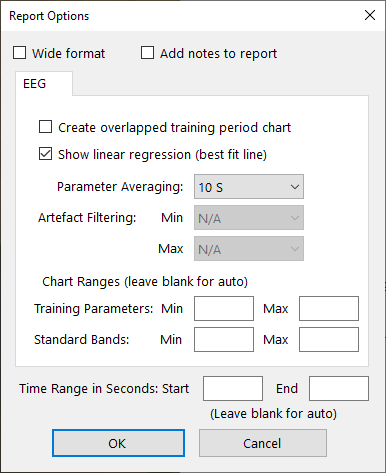
Report functionality is described in greater depth here.
Sample reports can be viewed here:
EEG Neurofeedback Training Session Report TO_DO
Sample EEG Neurofeedback Protocol Report TO_DO