Audio Breath Pacer User Guide
1 Introduction
The Mind-Body Training Tools Breath Pacer generates a sound which in some sense simulates the breath by gently rising and falling in pitch. The user can follow the sound with his or her own breathing as a means of learning to regulate the breath. In addition, this breath signal is displayed as a bar graph that rises and falls, so that you can follow the pacing visually if you prefer. Breath pacing can be helpful as an adjunct to the Mind-Body Training Tools software especially the Heart Rate Variability application.
The software also generates brain stimulating audio signals called isochronic and binaural beats. These can be combined with the breath pacing function or used independently. These brain stimulation technologies may improve brain performance, however the specific nature of the effects depends on the frequency of the beats. Using the wrong frequency could produce a reduction of brain efficiency. I recommend you do not use the brain stimulation technology without some knowledge of their general effects. Ideally you would base your use on an assessment of your individual brain state. This guide does not cover the effects of different
The software produces two channels of sound. These can be independently controlled, so for example you can set them to different pitches to make a chord, and different (isochronic or binaural) beat frequencies. You can also independently pan the sounds to the left or right. This allows you to for example send different beat frequencies to the left and right ears (when listening on headphones). You can set the beats to be in phase or in anti-phase, enabling you to create interesting sound effects.
DISCLAIMER: the software is not designed to diagnose or treat any medical condition.
WARNING: people with a history of epilepsy or seizures should not use the brain stimulating beats, although they should be able to safely use the breath pacing function. You should not use the software while driving or operating machinery.
2 System Requirements
The software works with Windows versions 8, 7, Vista and XP. You need to have the latest service packs installed.
The software was created using a Microsoft product called the dot net framework, which requires at least a 1 GHz processor speed, a minimum of 512 MB of RAM, and approximately 2 GB of disk space.
3 Software Installation
The software can be downloaded from the MBTTBiofeedback.co.uk website. You will download a zip (compressed) file, which must first be unzipped. The file is self-extracting.
Once extracted, you should install the software by running “setup.exe”. This initiates the installation process – follow the on-screen instructions. You'll be required to agree the licence terms.
As mentioned, the software requires a Microsoft component called the dot net framework. You may already have this installed, but if not, or if you have an older version installed, the installer will attempt to download it from the internet. If your computer does not have an internet connection to should be able to download it elsewhere and install it yourself. Look for version 4 of the dot net framework. You will likely need the most up to date service pack for your operating system.
The installation automatically adds an icon to your desktop, and an entry in your 'All Programs' menu (Windows start button).
4 Running The Software
To start the program, double-click the desktop icon that was added by the installation, or alternatively start it from the 'All Programs' menu. (Click your start button, then find the programs menu, in older versions of Windows, 'All Programs', then find the 'Mind-Body Training Tools' folder, then 'Breath Pacer').
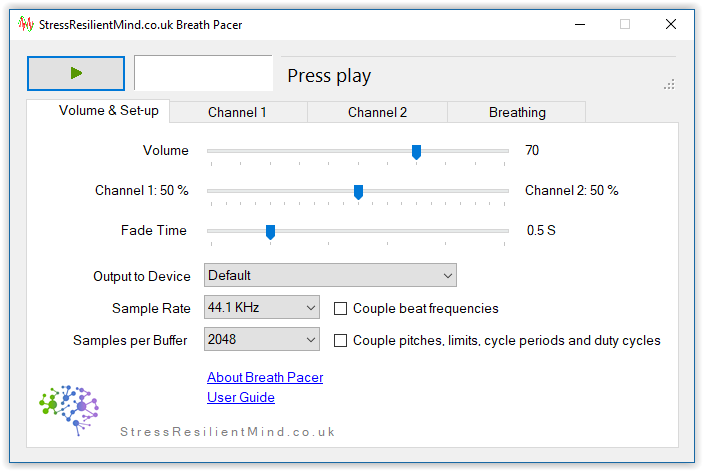
When the software starts you'll see a window as shown in figure 1 below (the Volume & Set-up tab is selected by default).
4.1 Starting and Stopping the Sound
A button in the top left of the window toggles the sound on and off when clicked with your mouse. Initially it is displayed with a green triangle (for play) – this changes to a red square after you've pressed it. The other controls in the interface can be used to configure the actual sound. If you don't hear anything after pressing the play button, reading the following section may help.
A text box displays elapsed time and there is also a status display (Playing, Stopped, etc).
4.2 Sound Device Settings
Some of the controls in the first tab pertain to your computer's sound card. They generally need configuring rarely (once set you can largely forget about them).
4.2.1 Output to Device
If your computer has more than one audio device installed, you can use this combo box control (the uppermost combo box in figure 1) to select which one to use. (If this doesn't mean anything to you, leave it set to 'Default'.)
4.2.2 Sample Rate
This combo box control sets the rate at which audio data is sent to your sound card. In general the higher the rate, the better the sound quality. The default setting of 44.1 kHz is equivalent to audio CD quality. You can reduce this if performance is an issue. If your computer is slow then the sound may contain clicks and crackles. Personally I find it difficult to notice the difference made by reducing the sample rate.
4.2.3 Samples Per Buffer
The meaning of this control is rather technical. My advice is to set this to the lowest number that doesn't lead to clicks and crackles. The following is a technical explanation, for those interested. Sound data is sent to your computer's audio device in packets called buffers, of which there are two. When one buffer has been played, the other is started. While one is playing, the software fills the other up with fresh audio data, and then sends it on to the sound device. This control sets the size of the buffer, and thus how long each buffer takes to play as sound. If the buffer is too small, the software doesn't have time to refill one buffer before the other is finished playing, and the result is clicks and crackles. The setting you need depends on the speed of your computer.
In addition the bar graph representation of the breath signal gets update once per buffer. With a high setting, the graph doesn't update smoothly – one more reason to keep the setting as low as you can.
4.3 Volume Controls
Again in the Volume & Set-up tab, there are two slider controls for volume (at the top of the Volume & Set-up tab shown in figure 1). The first sets the overall volume of the audio output. Note it is independent of the Windows volume control (the latter can also be used to change the Breath Pacer's volume).
The second sets the relative weighting of the two channels. At the extreme left, only channel 1 is audible, while at the extreme right only channel 2 is audible. The correct setting is simply a matter of taste. If you set the channels to different pitches, then you create a chord, which you may find more aesthetic. You can set the relative contributions of the higher and lower notes. If you have the channel pitches set to be the same, then moving this slider has no practical effect.
4.3.1 Fade Time
When you press play / stop button, the sound smoothly ramps up and down in volume. This control sets how quickly the transition happens (at both start and stop).
4.4 Coupling Options
The two check box controls in the Volume & Set-up tab allow you to link the two channels, so that only one of the slider controls sets both channels. Channel 2 is always set to be the same as channel 1. The upper check box pertains to the beat frequencies, and the lower to other channel settings (see section 7 below).
5. Using the Breath Pacer
Using the software in breath pacer mode generates a sound which rises and then falls in pitch, repeatedly, as a kind of simulated breath sound. In addition, a bar chart displays the signal visually. The user follows the sound (and/or chart) with his or her own breathing, inhaling with the rising pitch, then exhaling with the falling pitch.
To use the software in breath pacing mode, the Pitch Control (combo box) needs to be set to 'Breath Pacer' (which it is by default) in one or preferably both of the channels (see section 7 and also figure 3 below). Next you need to set the breathing parameters, using the controls in the Breathing tab.
Figure 2 above shows the controls for the breath pacer, and the table below describes their use. The bar chart in red at the right shows the breath signal visually.
|
Breathing Rate |
Self-explanatory |
|
Inhalation to exhalation ratio |
Most people find it more calming if the exhalation phase lasts longer than the inhalation phase. |
|
Pause after in-breath |
You can set a pause after the inhalation phase. During the pause the sound does not vary (in pitch or volume). The length of the pause is set as a percentage of the inhalation time. Changing this setting does not change the inhalation to exhalation ratio but the pause is counted as part of the inhalation. Changing the inhalation to exhalation ratio, or the breathing rate, causes the actual duration of the pause to change. |
|
Pause after out-breath |
You can set a pause after the exhalation phase. Works analogously to the above control |
|
Volume follows first derivative |
With this option checked, the breath sound goes quiet at the breath's turning points. Without it, the volume is continuous. |
|
% Change in volume |
Sets the degree to which the sound goes quiet at the breath's turning points. At 100% there is silence at the turning points. |
5.1 Suggested Settings
I suggest that for aesthetic reasons the pitch should rise and fall only gently – this means setting the pitch upper and lower limits to be relatively close together. I typically have them just one step apart (e.g. 320 Hz and 340 Hz).
Again for aesthetic reasons I suggest checking the 'Volume follows first derivative' option, and setting the percentage change to be relatively high (e.g. 80%).
Using both channels in breath pacer mode, with one channel having higher limits and the other lower, creates a pleasant chord.
I suggest having a relatively longer exhalation phase (e.g. 60%) since most people find this more relaxing. Research suggests that meditators naturally breathe this way.
Personally I use a pause after the exhalation (10%) but not after the inhalation.
All these settings are actually the defaults, when you first install the software.
6 Brain Stimulation Technologies
The software allows you to embed binaural beats or isochronic beats in the sound. These are thought to affect brain functioning.
Isochronic beats are simply pulses of sound. Figure 2 below shows the wave form of isochronic beats. (Note the beats have smooth amplitude changes.)


Figure 2: Isochronic beats waveforms
Binaural beats are more complex – in fact the beat effect is created by the brain. To produce a binaural beat you play sounds to each ear, which differ in pitch or frequency. If the frequency difference is small, then then a beat effect can be perceived where the beat frequency is the difference between the two pitches. For example playing a note at 120 Hz to the left ear and 124 Hz to the right ear, then you hear a beat at 4 Hz (4 beats per second).
Clearly binaural beats only work if you are listening using headphones.
It is thought that these technologies work by stimulating the brain's frequency following response. (There may be other mechanisms besides.) Much of brain activity is rhythmic – for example EEG (electroencephalograph) activity reveals many such rhythms. The brain's natural rhythms can follow external stimulation such as flashing lights or audio beats. The brain rhythm frequency matches that of the external rhythm. This is known as entrainment.
Entrainment may have positive effects on brain function, but it stands to reason that it may also have a negative effect. I recommend you do some research before using brain stimulation.
The key parameter is the beat frequency. You can set this in the software, independently for each channel (see section 7 below).
6.1.1 Switching Off Brain Stimulation
To deactivate beats simply set the beat frequencies (for each channel) to zero. The beat frequency controls are located in the Channel tabs.
6.1.2 Selecting Binaural or Isochronic Beats
The Wave Form control (on each Channel tab) selects between binaural and isochronic beats. For isochronic beats, you can have left and right either in phase (left and right in sync) or in anti-phase (left then right then left etc.). Mostly you would select in phase (for brain entrainment).
7 Channel Controls
Each channel has a set of controls – sliders and combo boxes – located under separate tabs ('Channel 1' and 'Channel 2' tabs).
Figure 4 above shows the controls, and the table below describes their use.
|
Pitch Control |
This combo box control sets how the pitch is determined. There are four options:
|
|
Wave Form |
With this control you can set the sound to embed either binaural beats or isochronic beats. In the latter case you can set the left and right channels to either be in phase (in sync) or in anti-phase. Note, when the beat frequency is set to zero no beats can be heard and the setting of this control makes no practical difference. |
|
Pitch |
Applies when Pitch Control is set to 'Slider', in which case it sets the pitch of the channel's sound. |
|
Beat Frequency |
Sets the frequency of isochronic or binaural beats for the channel. Setting it to zero effectively deactivates the brain stimulation technology. |
|
Pitch Lower Limit |
Applies only when Pitch Control is set to either cycle (up or down) or breath pacer. This slider sets the lower (deeper) limit of the pitch variation over the cycle (or the “breath”). |
|
Pitch Upper Limit |
Applies only when Pitch Control is set to either cycle (up or down) or breath pacer. This slider sets the higher limit of the pitch variation over the cycle (or the “breath”). |
|
L-R Panning |
Shifts the sound between left and right channels. At the extreme left the sound will only play in the left speaker – and likewise only in the right speaker at the right side. By setting the two channels to opposites you can direct different beat frequencies to opposite ears (brain hemispheres). |
|
Cycle Period |
Cycle period applies when Pitch Control is set to either Cycle Up or Cycle Down. It sets the duration of the cycle |
|
Duty Cycle |
Applies to isochronic beats only. With a higher value (thumb towards the left pole) the beats are sharper with longer silences between. With the thumb towards the right (negative values) the beats are less distinct and blur into each other. Figure 3 shows isochronic wave forms with different duty cycles. |
7.1 Pitch Steps
The pitch slider, and the pitch upper and lower limit sliders, are set so that changing by one step effects a pitch change equivalent to one note on a major scale (equivalent to the white keys on a piano keyboard). Thus increasing by seven steps causes the note to rise one octave higher.
7.2 Beat Frequency Steps
The beat frequency step changes are not uniform. At lower frequencies you can change by a half or even a quarter beat per second. Also you can set the beat frequency to the Schumann frequency (7.83 Hz) which is thought to have special significance as a kind of resonant frequency in the Earth's natural electromagnetic field.
8 Recording
It is not possible to record the sound produced by the Breath Pacer program directly. However I have been able to make recordings using a well-known third-party software called Audacity, which is free to download. You may have to experiment with settings before it works. I can't offer technical support in this regard.
9 Suggested Further Uses
9.1 Bilateral Stimulation
It is possible to create an effect whereby the sound appears to pan between left and right sides of the head (when listening on headphones). This may be used by therapists who are trained in bilateral stimulation techniques for trauma resolution.
To create this effect:
-
From the Volume & Set-up tab, check the two check boxes to couple the two channels.
-
Set the channel volume mixer to be 50-50.
-
Set the Pitch Control for both channels to Slider (simplest case).
-
Set channel 1 panning to be 100% to the left and channel 2 to be 100% to the right.
-
Set the wave form of channel 1 to be isochronic beats, in-phase, and channel 2 to be isochronic beats, anti-phase.
-
Set the beat frequency to a relatively low value.
You can experiment with the duty cycle control to find your preferred setting.
You should only attempt to use trauma resolution techniques if you are a trained therapist.
9.2 Hypnotic Induction
You may use the Cycle Down mode, with a beat frequency perhaps in the alpha or theta range, to assist with hypnotic induction. (Probably you would use a relatively long cycle time.)
10 Support
The Mind-Body Training Tools Breath Pacer software is available free of charge and as such no technical support can be offered, except on a pro rata basis.